Introduction
Emails serve as our gateway to various online services and platforms. ZK Email uses zk proofs to authenticate these interactions on chain while preserving privacy.
If you are trying to setup a new circuit for yourself, we recommend the full automated circuit generation tool at our Registry -- it automatically generates and deploys your circuit specifications with an automatic frontend demo, in as few as 5 minutes with no ZK expertise needed.
However, if you want to go more custom into the circuits and contracts, this guide will walk you through setting up a circuit that enables you to verify your Twitter username on-chain from scratch. It does not reveal any information beyond the username itself. This process uses ZK Email libraries and regex verification to ensure the authenticity and privacy of your Twitter username, allowing you to mint an NFT upon completion. Note that it uses a slightly outdated version of the SDK, but the process is very similar, and you can refer to the SDK docs for more information.
Experience it Yourself
Before diving into the technical details, we encourage you to experience Proof of Twitter firsthand. Visit https://twitter.prove.email/ to interact with a user-friendly interface to try it out. This hands-on experience will provide you with a practical understanding of the concepts we'll explore in this guide, making the process of building your own circuit more intuitive.

ZK Email Library
The ZK Email library contains 3 packages.
-
zk-email/helpers - helper functions to help generate and verify the inputs of the circuit
-
zk-email/contracts - contains the DKIM Registry for public domains (google, yahoo, etc)
-
zk-email/circuits - circuit templates that are used in creating your circuit
Setting up the Repository
Create a new folder and initiate your repository:
yarn init -y
Install all three packages by running:
yarn add @zk-email/circuits @zk-email/helpers @zk-email/contracts
Preparing the Email from Twitter Containing the Username
To verify ownership of a Twitter account, we will use the "Forgot your password" email from Twitter. This email inherently includes the username and can be generated at any time. By authenticating this email, we can confirm that the user has control over the corresponding Twitter account.
Let's start by obtaining the raw email file:
-
Initiate a password reset process on Twitter to send yourself a reset email.
-
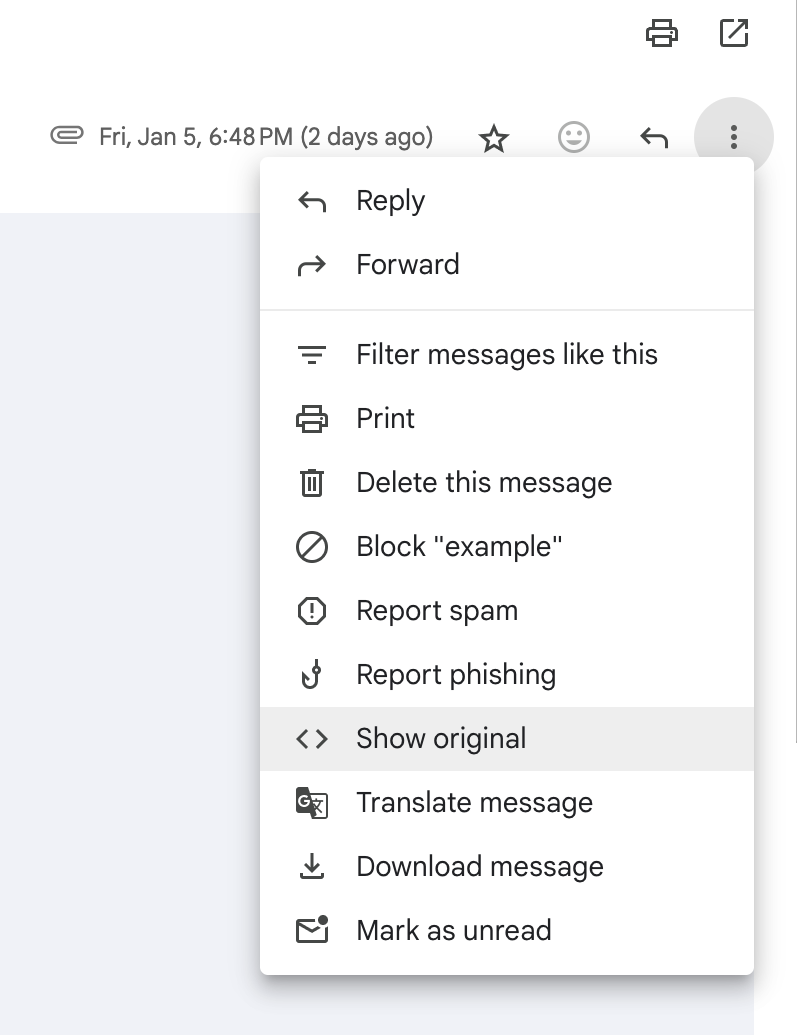
Locate the email from Twitter in your inbox and download its headers. If you're using gmail you can find this option under a menu represented by three dots, then select 'Download Message'. You can also do 'Show Original' then 'Copy to Clipboard'.
For different email clients, the process varies slightly:
Outlook
If you're using Outlook, switch to plain text mode. Then, copy and paste the 'full email details' into the textbox on the client-side webpage.
Gmail and Yahoo
For Gmail and Yahoo users, select 'Download Original Message', then copy and paste the contents into the textbox.
- Finally, copy and paste the entire contents of the file into your .eml file.
Generating the Input for ZKRegex
Now, let's generate the input for a zk-regex. You can do this manually with the V1 zk regex code on zkregex.com, or automatically with our V2 zk regex code on registry-dev.zkregex.com.
For the sake of explanation, let's do it the manual way for our V1 regexes using zkregex.com. This tool will help us create a regular expression (regex) that matches the pattern of a Twitter username in the email body.
-
Go to zkregex.com.
-
Enter the regex for a Twitter username in the "Regex Pattern" field. We'll use
this email was meant for @([a-zA-Z0-9_]+) -
Input example Twitter usernames in the "Input 1", "Input 2", and "Input 3" fields, like
this email was meant for @yush_g,this email was meant for @zkemail, andthis email was meant for @elonmusk. -
Click "Test" to generate and test the Circom and Halo2 circuits. Note that the screenshot below is for the regex
@([a-zA-Z0-9_]+)\.-- you'll have to figure out how to adapt it to this Twitter example.
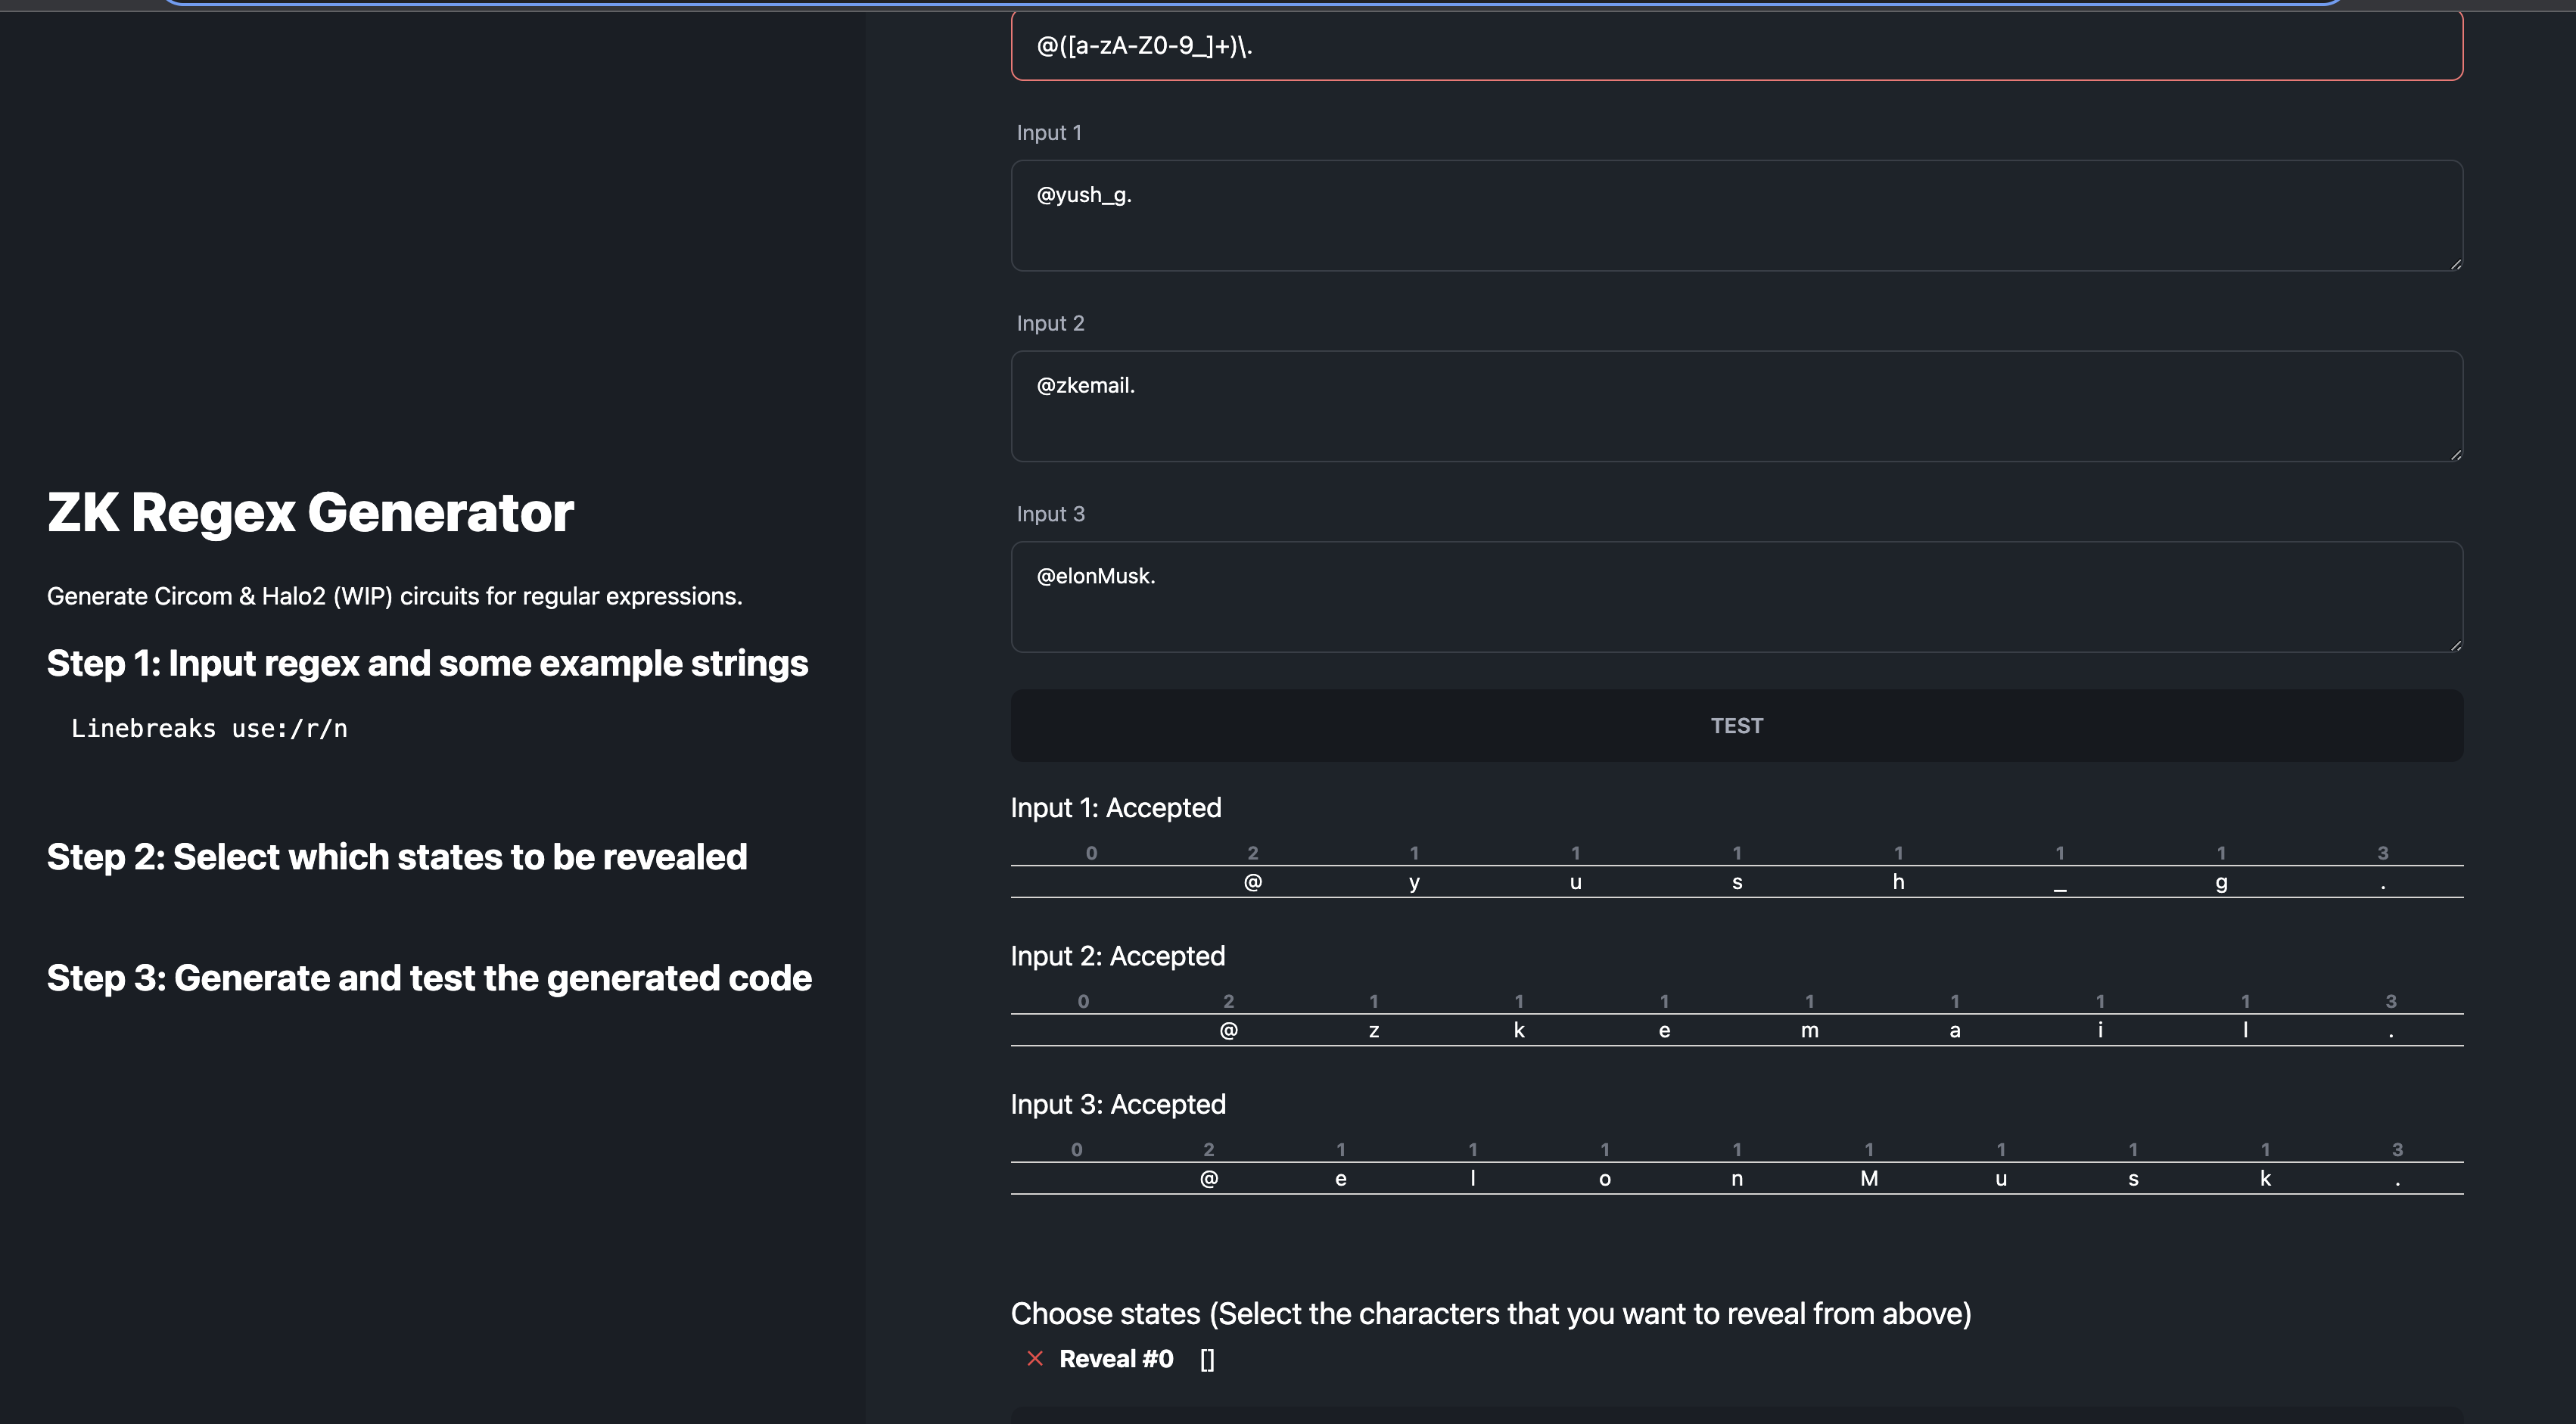
-
In the "Select which states to be revealed" step, choose the states that correspond to the Twitter username.
-
Click "Generate" to get the Circom code for your circuit.
We will integrate the regex circuit generated into our primary circuit. This will allow us to demonstrate that a user possesses an email authenticated by Twitter's private key. We can verify the presence of a string in the email body that corresponds to the user's Twitter handle and publicly disclose the username as part of the proof.
Creating Inputs for Your Circuit
After setting up the main Twitter verification circuit, we can proceed to generate inputs for your circuit using the ZK Email helpers SDK.
You can create a inputs.ts file and place this code inside:
import { bytesToBigInt, fromHex } from "@zk-email/helpers";
import { generateCircuitInputs } from "@zk-email/helpers";
import { verifyDKIMSignature } from "@zk-email/helpers"
import fs from "fs"
import path from "path"

export const STRING_PRESELECTOR = "email was meant for @";
export const MAX_HEADER_PADDED_BYTES = 1024;
export const MAX_BODY_PADDED_BYTES = 1536;

export async function generateTwitterVerifierCircuitInputs() {
    const rawEmail = fs.readFileSync(
        path.join(__dirname, "./emls/rawEmail.eml"),
        "utf8"
      );
    const dkimResult = await verifyDKIMSignature(Buffer.from(rawEmail));
    const emailVerifierInputs = generateCircuitInputs({
        rsaSignature: dkimResult.signature,
        rsaPublicKey: dkimResult.publicKey,
        body: dkimResult.body,
        bodyHash:dkimResult.bodyHash,
        message: dkimResult.message,
        shaPrecomputeSelector: STRING_PRESELECTOR,
        maxMessageLength: MAX_HEADER_PADDED_BYTES,
        maxBodyLength: MAX_BODY_PADDED_BYTES
    });

    const bodyRemaining = emailVerifierInputs.in_body_padded!.map(c => Number(c));
    const selectorBuffer = Buffer.from(STRING_PRESELECTOR);
    const usernameIndex = Buffer.from(bodyRemaining).indexOf(selectorBuffer) + selectorBuffer.length;

    const address = bytesToBigInt(fromHex("0x71C7656EC7ab88b098defB751B7401B5f6d897")).toString();

    const inputJson = {
        ...emailVerifierInputs,
        twitter_username_idx: usernameIndex.toString(),
        address,
    };
    fs.writeFileSync("./input.json", JSON.stringify(inputJson))
}

(async () => {
    await generateTwitterVerifierCircuitInputs();
}) ();
If something goes wrong, you can try compiling the full helper example. To create the inputs.json file run:
npx ts-node inputs.ts
This script reads your raw email file, verifies the DKIM signature, generates the circuit inputs, and writes them to an input.json file.
This input.json file will be used later for witness generation and proving.
The generateTwitterVerifierCircuitInputs function is the main function that does all the work. It uses helper functions from the @zk-email/helpers package to generate the inputs and write them to a file.
Remember to replace the address and the path to the raw email file with your own wallet address.
Constructing Your Twitter Circom File
To set up your Twitter circuit, follow these steps:
Step 1: Integrate the Required Files into Your Circom File
To build your circom circuit, you need to import two files. The first one is the email-verifier.circom from our library. The second one is the twitter_reset_regex.circom file that you generated earlier in this tutorial.
include "@zk-email/circuits/email-verifier.circom";
include "/twitter_reset_regex.circom";
The email-verifier.circom file validates each of the inputs to the circuit, while the twitter_reset_regex.circom file scans the email body for the '@username', ensuring it adheres to the specified regex definition.
Step 2: Start Your Circuit Template
template TwitterVerifier(max_header_bytes, max_body_bytes, n, k, pack_size) {}
In this step, we start the circuit template with the following arguments:
max_header_bytes = 1024 - This is the maximum number of bytes in the header.
max_body_bytes = 1536 - This is the maximum number of bytes in the body after the precomputed slice.
n = 121 - This is the number of bits in each chunk of the pubkey (RSA parameter).
k = 17 - This is the number of chunks in the pubkey (RSA parameter). Note that 121 * 17 > 2048.
pack_size = 31 - This is the number of bytes that can fit into a 255ish bit signal (can increase later).
Step 3: Define Your Circuit Inputs and Outputs
    signal input in_padded[max_header_bytes];
    signal input pubkey[k];
    signal input signature[k];
    signal input in_len_padded_bytes;
    signal input address;
    signal input body_hash_idx;
    signal input precomputed_sha[32];
    signal input in_body_padded[max_body_bytes];
    signal input in_body_len_padded_bytes;
    signal input twitter_username_idx;

    signal output pubkey_hash;
    signal output reveal_twitter_packed[max_twitter_packed_bytes];
The circuit's inputs are all private unless explicitly stated otherwise, while outputs are always public. In this example, we have several inputs and outputs.
Inputs
in_padded[max_header_bytes] - Prehashed email data.
pubkey[k] - RSA public key.
signature[k] - RSA signature.
in_len_padded_bytes - Length of the email, including padding.
address - Wallet address.
body_hash_idx - Index of the body hash.
twitter_username_idx - Index of twitter username.
Outputs
pubkey_hash - Hash of the public key, cross-referenced with the public key in our DKIM registry to authenticate the origins of the email.
reveal_twitter_packed - Packed Twitter username that has been verified and is ready for reveal.
Step 3: Define the EmailVerifier Component
This part of the code defines the EmailVerifier component and assigns the necessary inputs to it. The EmailVerifier is a crucial part of the circuit as it validates the email inputs.
component EV = EmailVerifier(max_header_bytes, max_body_bytes, n, k, 0);
    EV.in_padded <== in_padded;
    EV.pubkey <== pubkey;
    EV.signature <== signature;
    EV.in_len_padded_bytes <== in_len_padded_bytes;
    EV.body_hash_idx <== body_hash_idx;
    EV.precomputed_sha <== precomputed_sha;
    EV.in_body_padded <== in_body_padded;
    EV.in_body_len_padded_bytes <== in_body_len_padded_bytes;

    pubkey_hash <== EV.pubkey_hash;
Step 4: Add the Twitter Username Verification Component
In this part of the code, we will add the code to verify the Twitter username that is found in the email body.
We start by defining the maximum length of a Twitter username and calculating the maximum number of bytes it can occupy when packed.
 var max_twitter_len = 21;
 var max_twitter_packed_bytes = count_packed(max_twitter_len, pack_size);
Next, we use the TwitterResetRegex function to compute the regex states on each character in the email body. This function is part of the circom code we generated earlier. It ensures that at least one match is found in the email body, i.e., the match count is not zero.
    signal (twitter_regex_out, twitter_regex_reveal[max_body_bytes]) <== TwitterResetRegex(max_body_bytes)(in_body_padded);
    signal is_found_twitter <== IsZero()(twitter_regex_out);
    is_found_twitter === 0;
Finally, we pack the Twitter username for output, into a minimal fixed number of bytes using the ShiftAndPackMaskedStr function. This packing process combines 31 bytes into a single 255 bit circom signal, and the shift process isolates the match and moves it to the start of the output. It is necessary to ensure that the username fits into the minimal output signal size.
reveal_twitter_packed <== ShiftAndPackMaskedStr(max_body_bytes, max_twitter_len, pack_size)(twitter_regex_reveal, twitter_username_idx);
For the finished circuit, refer to the following code:
To understand the contracts on-chain that verify this proof, you can peek at the smart contracts as well.
Compiling and Computing the Witness
After setting up your Twitter circuit, the next step is to compile it and compute the witness. This process involves generating the verification key (vkey) and the zk-SNARK proving keys (zkeys).
Compilation
To compile the circuit locally, you need to have Rust and Circom installed first. You can visit this link to install both: https://docs.circom.io/getting-started/installation/#installing-dependencies
circom -l node_modules TwitterVerifier.circom -o --r1cs --wasm --sym --c
This process will generate a r1cs file, a wasm file, and a sym file. These files are essential for generating the vkey, zkey, and computing the witness.
Compute the witness
Now, let's move on to computing the witness. The role of the witness is to ensure that the circuit's signals adhere to the defined constraints.
Execute the following command in your terminal:
node generate_witness.js twitterverifier.wasm input.json witness.wtns
Generating Proving and Verification Keys
For in-browser proving, we will generate chunked zkeys. This is because the twitter.circom file is quite large, leading to extended proving times.
To begin, install this specific version of snarkjs which supports chunked key verification.
npm install snarkjs@git+https://github.com/vb7401/snarkjs.git#24981febe8826b6ab76ae4d76cf7f9142919d2b8
In case you're performing server-side proving, you can install the standard version of snarkjs.
npm install -g snarkjs
The process of generating proving and verification keys for a zk-SNARK circuit involves several steps.
- Download Phase 1 File: First, download the
powersOfTau28_hez_final_22.ptaufile from the provided URL. This file is necessary for thezkey newcommand to generate the initial.zkeyfile with zero contributions.
bash
wget https://hermez.s3-eu-west-1.amazonaws.com/powersOfTau28hez_final22.ptau
- Apply the random beacon: This step applies a random beacon to the powers of tau file. The beacon is a random number that is publicly known.
snarkjs powersoftau beacon pot22_0001.ptau pot22_beacon.ptau 0102030405060708090a0b0c0d0e0f101112131415161718191a1b1c1d1e1f 10 -n='Final Beacon'
- Prepare for phase 2: This step prepares the powers of tau file for the second phase of the trusted setup.
snarkjs powersoftau prepare phase2 pot22_beacon.ptau pot22_final.ptau -v
- Contribute to phase 2: This step creates a new zk-snark circuit and contributes to the second phase of the trusted setup.
snarkjs zkey new pot22_final.ptau twitterverifier.wasm twitter_0000.zkey
snarkjs zkey contribute twitter_0000.zkey twitter_0001.zkey --name='1st Contributor Name' -v
- Apply the final beacon: This step applies a final beacon to the Twitter circuit.
snarkjs zkey beacon twitter_0001.zkey twitter_final.zkey 0102030405060708090a0b0c0d0e0f101112131415161718191a1b1c1d1e1f 10 -n='Final Beacon'
- Export the verification key: This step exports the verification key from the Twitter circuit. The verification key is used to verify proofs.
snarkjs zkey export verificationkey twitter_final.zkey
Now, you have the verification_key.json file which can be used to verify proofs off-chain.
To create a Solidity verifier that allows you to verify your proof on the Ethereum blockchain, run:
snarkjs zkey export solidityverifier circuit_final.zkey verifier.sol
This will generate a verifier.sol contract that is used to validate the proof on chain.
Contracts
The ProofOfTwitter.sol contract includes the required on-chain logic for verifying Twitter accounts. When the proof is validated successfully, an NFT is minted on the blockchain.
The contract begins by importing two crucial files: Dkimregistry.sol and Verifier.sol.
    import { Verifier } from "./Verifier.sol";
    import "@zk-email/contracts/DKIMRegistry.sol";
Dkimregistry.sol maintains a registry of public domains. This registry is used to cross-verify the domain from which the email originated in the proof.
Verifier.sol contract is responsible for validating the proof.
It then defines constants that represent the indices of various public signals within the proof, such as the DKIM public key hash, the Twitter username, and the Ethereum address. These constants are used to retrieve the corresponding values from the signals array during verification.
    uint32 public constant pubKeyHashIndexInSignals = 0; // index of DKIM public key hash in signals array

    uint32 public constant usernameIndexInSignals = 1; // index of first packed twitter username in signals array

    uint32 public constant usernameLengthInSignals = 1; // length of packed twitter username in signals array

    uint32 public constant addressIndexInSignals = 2; // index of ethereum address in signals array
The contract includes a function to verify the DKIM public key hash against a registry to ensure the email's authenticity:
    bytes32 dkimPublicKeyHashInCircuit = bytes32(signals[pubKeyHashIndexInSignals]);
    require(dkimRegistry.isDKIMPublicKeyHashValid(domain, dkimPublicKeyHashInCircuit), "invalid dkim signature");
It also contains a function that uses the verifier contract to check the validity of the provided proof:
    require(
        verifier.verifyProof(
            [proof[0], proof[1]],
            [[proof[2], proof[3]], [proof[4], proof[5]]],
            [proof[6], proof[7]],
            signals
        ),
        "Invalid Proof"
    );
Additionally, the contract includes logic to extract the Twitter username from the packed signals array. Although currently, a Twitter username can fit within a single signal, the code is designed to handle longer usernames that may span multiple signals:
    uint256[] memory usernamePack = new uint256[](usernameLengthInSignals);
    for (uint256 i = usernameIndexInSignals; i < (usernameIndexInSignals + usernameLengthInSignals); i++) {
        usernamePack[i - usernameIndexInSignals] = signals[i];
    }
Understanding these components is essential for anyone looking to build a system that leverages this contract for Twitter account verification using zk-SNARKs. The full contract code is available at the GitHub repository: ProofOfTwitter.sol
Conclusion
This guide provided just one example of a circuit you can build. For more examples and resources, you can check out the zk-email verifier usage guide and the Twitter Circuit Code.
This is just the beginning of verifiable provenance data. As you continue to explore and build, you'll discover the vast potential of this technology. The power of zk-SNARKs allows for the creation of systems where data can be verified without revealing any additional information. This opens up a world of possibilities for privacy-preserving applications.
